Control Overview
The Date & Time control allows you to schedule when content should be visible on your website.
Usage Examples
- Create timed promotional content that starts and stops at specific times.
- Automate the public release of course or presentation material. Keep your content hidden until the course or presentation has started.
- Use the Day of Week settings to present a special offer on Mondays. Or let your customers know you are closed on the weekend.
- Use the Time of Day settings to let your users know when support requests are being monitored, like on our Contact page.
Video Tutorial
Configuration
How to Enable
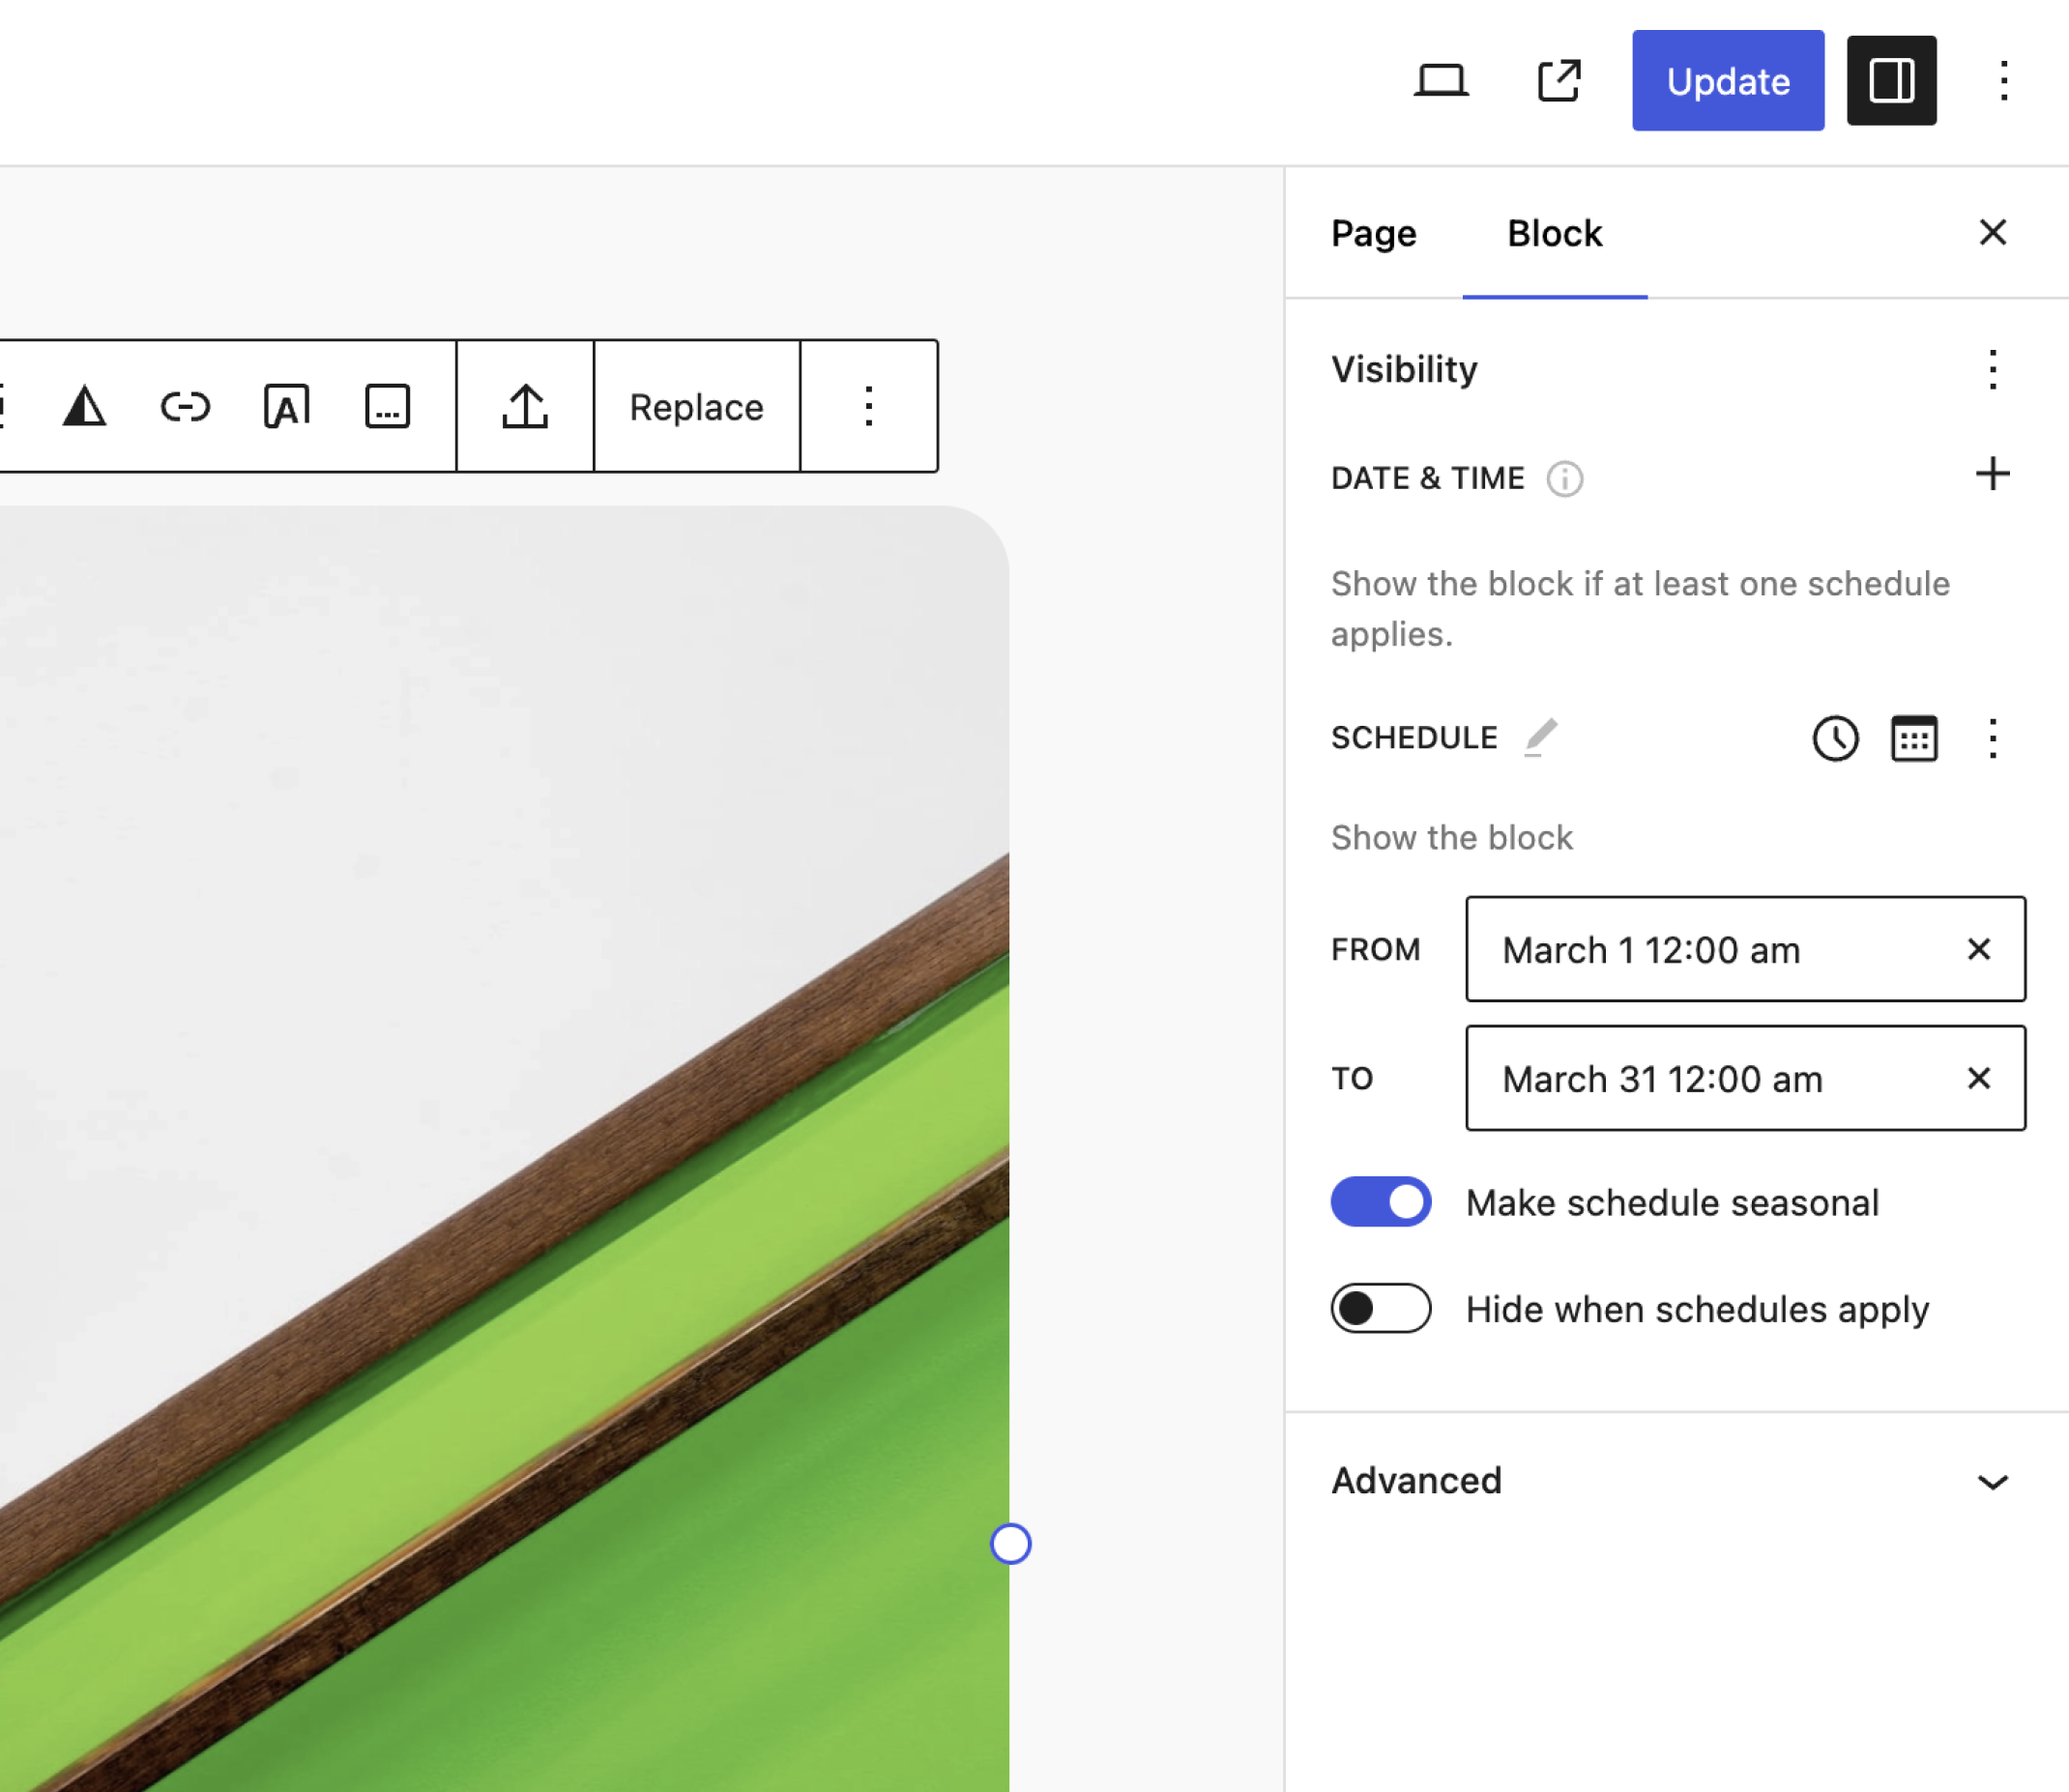
Click on any block in the Block Editor and navigate to the Visibility panel. You will notice the Date & Time control located underneath the Controls Toolbar. See the screenshot below. This control is enabled by default for all blocks. You can choose which controls are automatically enabled in the plugin’s General Settings.

How to Configure
If you haven’t already, watch the video above for an overview of all the new Date & Time features available in Block Visibility 1.8.0.
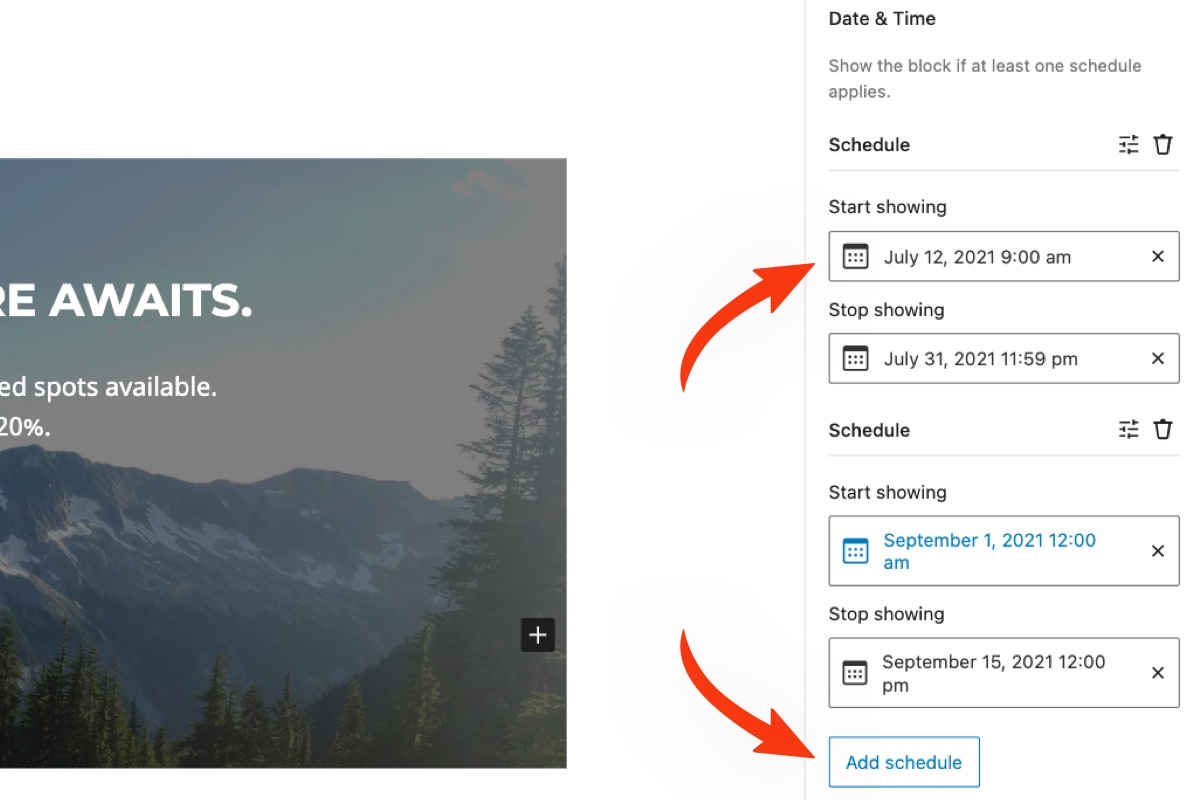
Instructions are always better with examples. Let’s assume that we are running a promotion that needs to be visible between 9:00 am on July 12th and run through midnight on July 30th. Then we want to create another schedule for the same promotion in September. We want the promotion to run from September 1st through noon on September 15th.
We will use the Cover block to create the promotional banner.
Steps to Complete
- Navigate to the Date & Time control settings in the Visibility panel.
- Click on the “Now” button under the “Start showing” heading, and a calendar will appear.
- Choose July 12, 2021, and set the time to 9:00 am. Then close the calendar popup.
- Click on the “Never” button under the “Stop showing” heading, and a calendar will appear.
- Choose July 30, 2021, and set the time to 11:59 pm. Then close the calendar popup.
- Click on the “Add schedule” button to create the second schedule.
- Click on the “Now” button under the “Start showing” heading in the new schedule, and a calendar will appear.
- Choose September 1, 2021, and set the time to 12:00 am. Then close the calendar popup.
- Click on the “Never” button under the “Stop showing” heading, and a calendar will appear.
- Choose September 15, 2021, and set the time to 12:00 pm. Then close the calendar popup.
The resulting configuration should resemble the screenshot below.
How to Disable
If you would like to disable the Date & time control at the block level, simply click on the three-dots icon in the Controls Toolbar and deselect it. That said, if you don’t think you will need this control on your website at all, it can be disabled globally in the Visibility Control Settings.
Note that if this control is disabled globally, any blocks that are actively being hidden by the Date & Time control will become visible again.
Control Settings
Schedules
The Date & Time control uses schedules, which are similar to rule sets in other visibility controls like the Location control. All settings within a schedule must be satisfied for the selected block to be visible. However, you can also create multiple schedules. Only one schedule needs to be applied for the block to be visible.
Within a schedule, you create AND conditions between each setting. Between two schedules, you create OR conditions.
As of Block Visibility 3.4.0, you can now set seasonal schedules. A seasonal schedule does not rely on the year. So, as long as the current date (year agnostic) falls within the range selected, the block will be displayed.
In addition to standard scheduling, the Date & Time control also supports recursion.
Day of Week
Enable the Day of Week settings by clicking on the “recursion” icon below the main schedule settings. Then choose the day(s) of the week that you would like the block to be visible. See the screenshot below.
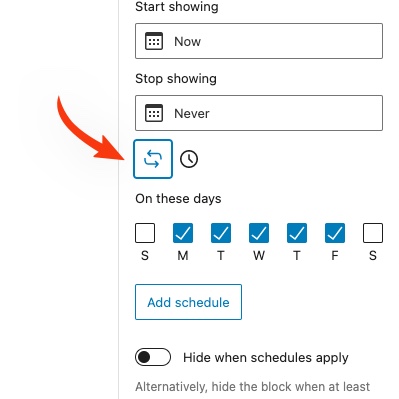
The Day of Week settings override the main Start and Stop settings. For example, assume you set the block to be visible between June 1st and June 3th and also chose Monday through Friday in the Day of Week settings. The block will be hidden on all Saturdays and Sundays between June 1st and June 3th.
That said, you do not necessarily need to set a Start and Stop date/time. Assume you want the selected block to only be visible every Monday. Just leave all other settings blank and choose “M” from the Day of Week settings.
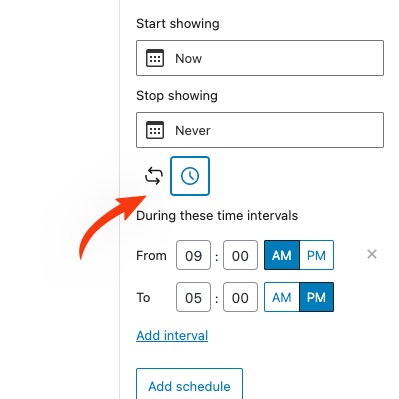
Time of Day
Enable the Time of Day settings by clicking on the “clock” icon below the main schedule settings. Then choose the time interval that you would like the block to be visible on. You can also set multiple time intervals. See the screenshot below.
The Time of Day settings behave as you would expect. They override the main Start and Stop settings and partially override the Day of Week settings. For example, assume you set the block to be visible Monday through Friday between June 1st and June 3th. In the Time of Day settings, you set a time interval of 9:00 am to 5:00 pm. The block will be hidden on all Saturdays and Sundays between June 1st and June 3rd due to the Day of Week settings. Then on Monday through Friday, the block will only be visible from 9:00 am to 5:00 pm.
That said, you do not necessarily need to set a Start and Stop date/time or Day of Week settings. Assume you want the selected block to only be visible from 9:00 am to 5:00 pm. Just leave all other settings blank and set the time interval accordingly in the Time of Day settings.
Hide When Schedules Apply
By default, the block will be visible if the applied schedule settings are satisfied. Simply toggle the “Hide when schedules apply” setting to hide the block instead.
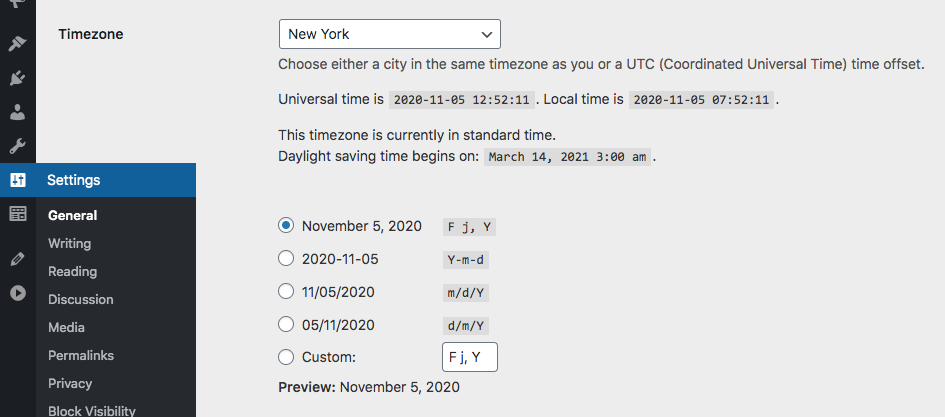
Timezones
Note that the timezone reflects the WordPress date and time settings for your website. To change this, edit them in the Settings → General admin screen. See below. You can also edit the date and time formats to better suit your needs, which will be reflected in the Block Visibility user interface.