Control Overview
With the Metadata control, you will be able to easily display blocks based on post and/or user metadata. Metadata is often referred to as custom fields and can be easily added to posts, pages, and custom post types in WordPress core. User metadata, on the other hand, is a bit more restrictive. Adding custom user metadata requires a bit of custom coding. That said, WordPress provides a decent amount of default user metadata, such as first_name, last_name, etc., that can be useful in configuring block visibility.
If you are looking for additional control over metadata, many great third-party plugins provide more sophisticated solutions than WordPress core, namely Meta box and Advanced Custom Fields (ACF). Note that if you are using ACF on your website, we recommend using the ACF control directly since it provides direct integration with ACF fields.
Configuration
How to Enable
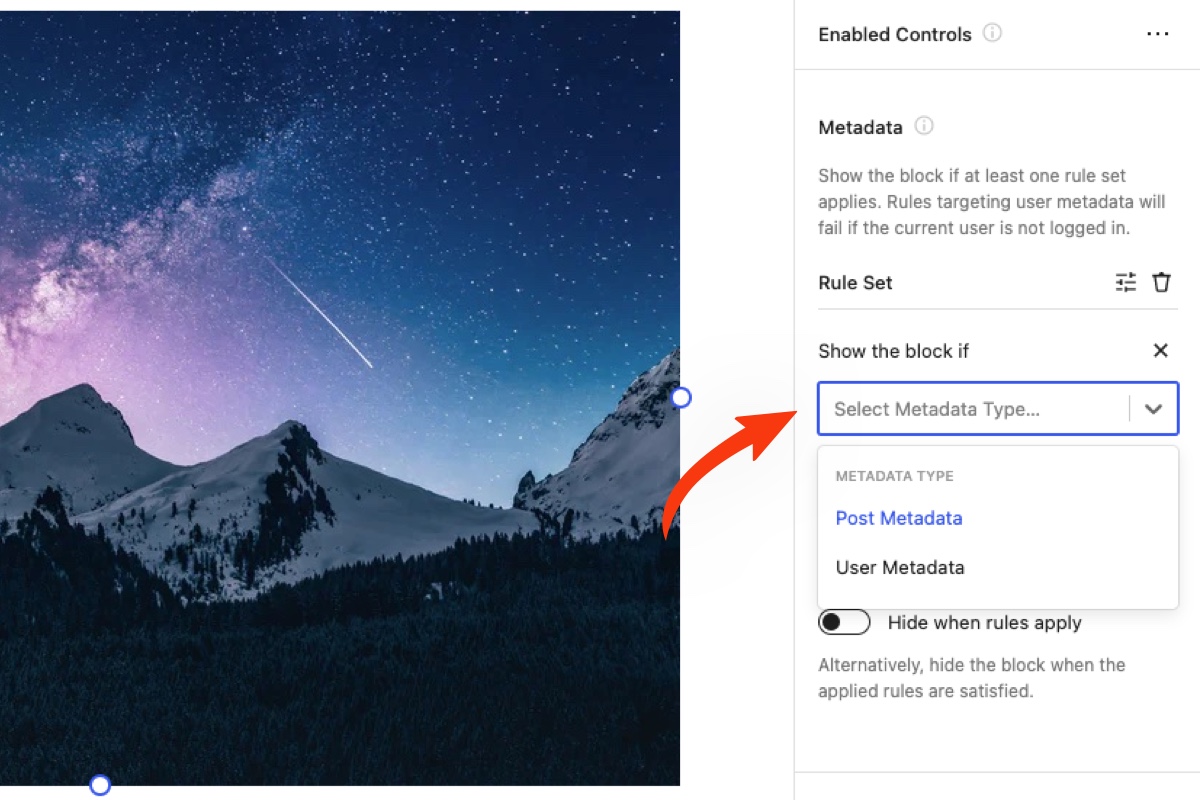
Click on any block in the Block Editor and navigate to the Visibility panel. You will notice an ellipsis icon in the Controls Toolbar. See the screenshot below. Click on the ellipsis, and all available visibility controls will appear. Select “Metadata” and the Metadata control panel will be added to the selected block.

How to Configure
Instructions are always better with examples. Let’s assume your website has a custom field on posts that indicates if a banner image should be displayed. Assume the post metadata key is show_banner_image and the custom field is configured like so.

You want to conditionally display an Image block if this field is set to true.
Steps to Complete
- Select the Image block and navigate to the Metadata control settings in the Visibility panel.
- Select “Post Metadata” from the rules selector.
- In the meta key field, enter
show_banner_image. - Choose “Value is equal to” for the condition.
- Finally enter
truefor the meta key value.
The resulting configuration should resemble the screenshot below.

How to Disable
If you would like to disable the Metadata control at the block level, simply click on the ellipsis icon in the “Controls” toolbar and deselect it. The control can also be disabled globally in the plugin’s Visibility Control Settings.
Note that if this control is disabled globally, any blocks that are actively being hidden by the Metadata control will become visible again.
Rules & Rule Sets
Like other Block Visibility controls, the Metadata control is powered by rules and rule sets. All rules within a rule set must be satisfied for the selected block to be visible. However, you can also create multiple rule sets. Only one rule set needs to apply for the block to be visible.
Within a rule set, you are creating AND conditions between multiple rules. Between two rule sets, you are creating OR conditions.
There are instances when rule errors can occur. For example, if rule inputs are not completely filled out or if the rule is based on a product that has since been deleted from your store. In these situations, the plugin defaults to showing the block unless other rules apply, which would hide the block.
Metadata Rules
When creating a new rule, you will have the option to choose either “Post Metadata” or “User Metadata”. When post metadata is selected, the plugin will check if the current post, page, or custom post type has the provided meta key and satisfies the rule. If user metadata is selected, the plugin will check if the current logged-in user has the provided meta key.
Note that if you select “User Metadata” and the current user is not logged in, the rule will fail, and the block will be hidden.
When a specific meta key is entered, you have the choice of 6 operators. These include:
- Has any value
- Has no value
- Value is equal to
- Value is not equal to
- Value contains
- Value does not contain
Once the operator is selected, enter the value to test the meta key against.
Hide When Rules Apply
By default, the block will be visible if the applied rules are satisfied. Simply toggle the “Hide when rules apply” setting to hide the block instead.