What is a Visibility Preset?
A Visibility Preset is a collection of visibility conditions that can be applied to any number of WordPress blocks in the Block Editor. This allows you to independently configure and manage the visibility of multiple blocks at once.
Check out the video below for a brief overview of how Visibility Presets work and how you can use them on your website.
Getting Started with Presets
Access the Visibility Preset Manager
First, you need to create your first visibility preset via the Visibility Preset Manager, which can be accessed in two ways.
Individual Blocks
Select any block and navigate to the Visibility panel in the Settings Sidebar. Using the options icon (three vertical dots), insert the Visibility Presets control. Then, click on the settings icon to launch the manager. If you have not created a preset yet, you will be given instructions on adding a new preset.

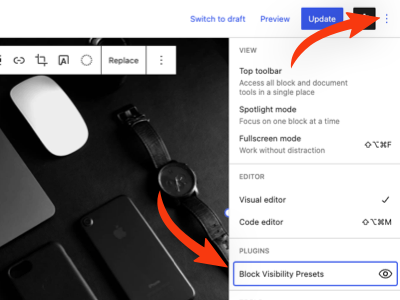
Block Editor Options Menu
Alternatively, you can access the Visibility Preset Manager directly from the options dropdown menu in the Block Editor.
Please note that presets can only be created and edited by Administrators or Editors. Authors will be able to apply existing presets to blocks, but they cannot make any changes to the presets themselves.
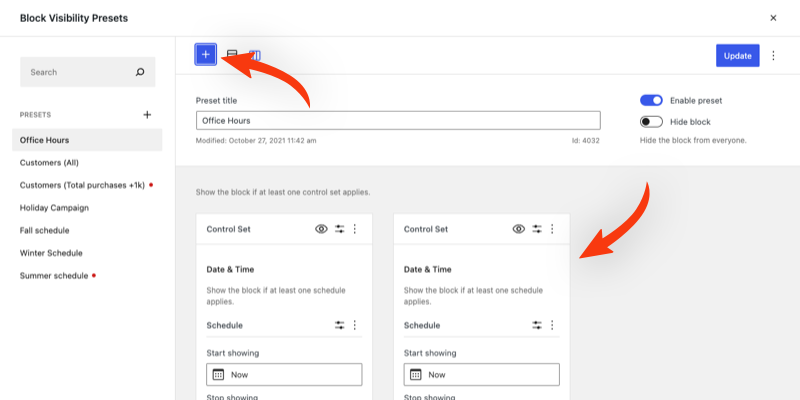
Create a New Preset
When the Visibility Preset Manager opens, you will be prompted to create a new preset or edit an existing one. All available presets are accessible from the sidebar navigation, which is fully searchable. You can also create a new preset at any time by clicking the plus (+) icon in the sidebar.

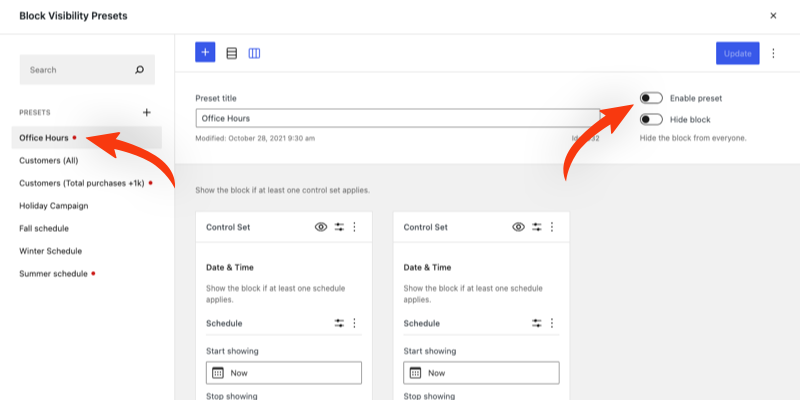
Configuring a Preset
Visibility Presets operate similarly to the visibility controls on individual blocks. Simply configure the controls that you would like to apply to the preset. When finished, publish the preset, and it will become available site-wide.
Add a Preset to a Block
Now that you have created a preset, the next step is to add it to an individual block. In the Block Editor, choose the block that should have the preset applied. Navigate to the Visibility panel and select your new preset from the dropdown. Presets can be added to any number of blocks, and a block can have any number of presets.
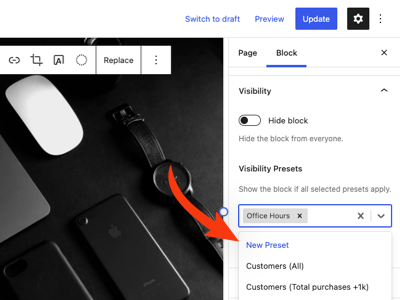
Note that if a block has multiple presets, all presets need to apply for the block to be visible. Furthermore, if a block has individual visibility settings in addition to presets, those will also apply when determining if the block should be shown or hidden.
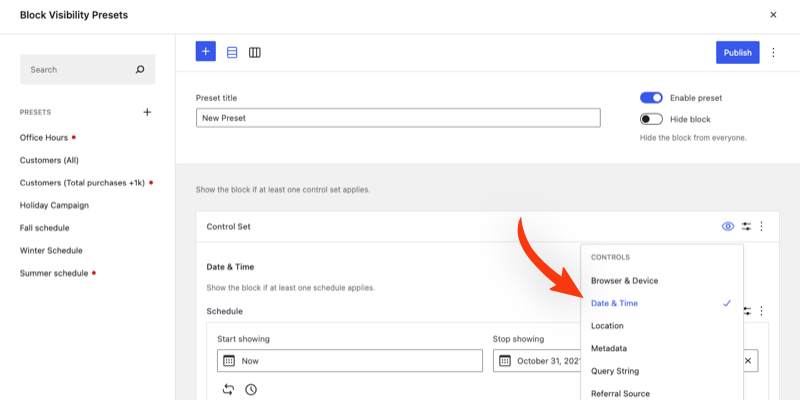
Add Additional Control Sets
When a preset is first created, it includes a single control set. A control set is a group of visibility controls that form “AND” conditions. For example, if a set includes the Date & Time control and the User Role control, both controls must be satisfied for the block to be visible.
There may be instances where you need “OR” conditions. Visibility presets make this easy. Simply add an additional control set by clicking the plus (+) icon in the navigation bar.
Blocks with this preset will be visible if either control set is satisfied. For more information on how controls and control sets work in Block Visibility, visit their dedicated Knowledge Base article.
How to Disable
Each preset includes the option to enable or disable. When a preset is disabled, any block currently hidden by the preset will become visible again. This functionality can be useful when you are still configuring a preset and are not quite ready to make it active. Disabled presets will have a little red dot to indicate they are disabled.
The Visibility Preset functionality can also be disabled entirely in the plugin’s Visibility Control Settings. Again, any block that is actively being hidden by a preset will become visible again if presets are disabled globally.